Why do some convention photos look cinematic while others feel like rushed hallway snapshots?
Cosplay photography is fast, crowded, and unpredictable-but that’s exactly what makes it exciting. With the right approach, even a busy convention floor can become a strong backdrop instead of a distraction.
Better cosplay photos come from more than an expensive camera. Lighting, posing, communication, timing, and respect for the cosplayer all shape the final image.
These cosplay photography tips will help you capture sharper, more expressive, and more memorable convention photos-whether you’re shooting with a DSLR, mirrorless camera, or phone.
What Makes a Great Cosplay Convention Photo: Lighting, Character, and Context
A strong convention photo is not just a sharp image of a costume. It combines clean lighting, believable character posing, and a background that supports the cosplay instead of fighting it. In busy venues, the best photographers make quick decisions about where the light is coming from, what distractions to avoid, and how the character should “feel” on camera.
Lighting is usually the biggest difference between a casual snapshot and a professional-looking cosplay portrait. If the convention hall has harsh overhead lights, move the cosplayer near a window, an open lobby, or a wall that reflects softer light. A small portable LED panel, speedlight, or even a phone light can help fill shadows under wigs, armor, and helmets.
- Use clean backgrounds: plain walls, themed displays, staircases, or outdoor areas often look better than crowded vendor aisles.
- Direct the pose: ask for one action that fits the character, such as drawing a sword, casting a spell, or looking over the shoulder.
- Edit with restraint: tools like Adobe Lightroom can improve exposure, color, and skin tones without making the costume look fake.
For example, a sci-fi armored cosplay photographed under green expo lighting may look dull and noisy. Moving the cosplayer ten feet toward a glass entrance, lowering the camera angle, and adding a little contrast in post-production can make the same costume look expensive and cinematic.
Context matters too. A magical girl pose in front of trash bins breaks the illusion, while the same pose near pastel signage or soft outdoor light feels intentional. Great cosplay photography respects the maker’s work and uses camera settings, location choice, and simple direction to show the character at their best.
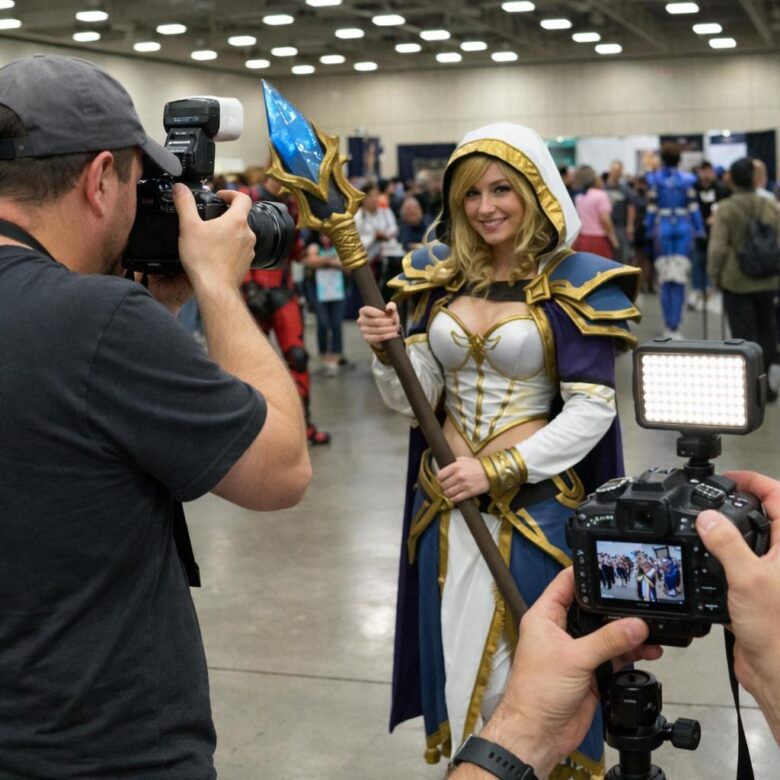
How to Direct Poses and Compose Shots in Crowded Convention Spaces
In a busy convention hall, strong direction matters more than expensive camera gear. Give the cosplayer one clear instruction at a time: “turn your shoulders toward the light,” “chin down slightly,” or “hold the prop closer to camera.” This keeps the session fast, respectful, and easier to manage when people are walking through your frame.
Use the environment instead of fighting it. Look for clean backgrounds near walls, staircases, sponsor banners, window light, or booth edges where traffic naturally slows down. At one anime convention, I moved a Spider-Man cosplayer just three feet beside a pillar, and the background changed from messy crowd clutter to a dramatic city-like vertical frame.
- Compress the scene: Use a 50mm or 85mm lens on a mirrorless camera or DSLR to blur distractions and make the subject stand out.
- Pose around the costume: Capes need movement, armor needs angles, and oversized props usually look best when pointed diagonally through the frame.
- Shoot in short bursts: Capture the pose before someone steps behind them, then adjust quickly.
For composition, leave space in the direction the character is looking or aiming. If the cosplay has a sword, staff, or blaster, avoid cropping off the tip unless you are doing a tight portrait. Small framing choices can make the photo look intentional rather than rushed.
After the shoot, use Adobe Lightroom to crop distractions, correct color from convention lighting, and apply noise reduction if you raised your ISO indoors. Good posing gets the image most of the way there; careful editing finishes the job.
Common Cosplay Photography Mistakes That Ruin Sharpness, Color, and Character Accuracy
One of the biggest mistakes is shooting wide open in a crowded convention hall without checking focus. A fast lens at f/1.4 can look cinematic, but if the focus lands on the wig instead of the eyes, the whole image feels soft. For full-body cosplay portraits, f/2.8 to f/4 is often safer, especially with a mirrorless camera and continuous eye autofocus.
Color problems usually come from mixed lighting. Convention centers often combine LED panels, tungsten lights, window light, and colored booth displays, which can make skin tones look green or armor look dull. Set a custom white balance when possible, or shoot RAW and correct it later in Adobe Lightroom using the eyedropper tool and HSL sliders.
- Using direct on-camera flash: It creates harsh shadows, shiny makeup, and flattened costume details. A small softbox, bounce flash, or portable LED panel gives cleaner results.
- Ignoring reference images: Character accuracy suffers when poses, props, or signature expressions are off. Keep a phone reference ready during the shoot.
- Over-editing skin and colors: Heavy presets can change wig tones, fabric texture, and makeup design. Calibrated editing matters if the cosplayer paid for premium prints or portfolio images.
A real-world example: a white-and-gold armor build photographed under blue hall lighting can look silver unless you correct white balance and protect highlights. Before delivering photos, compare the edit against the costume in person or a reference shot. Sharpness is technical, but accuracy is part of respecting the character.
Summary of Recommendations
Great convention photos come from preparation, respect, and quick creative choices in crowded, unpredictable spaces. Before you press the shutter, decide what matters most: the costume detail, the character’s mood, or the energy of the event. That choice should guide your angle, background, lighting, and timing.
Practical takeaway: keep your setup simple, communicate clearly with cosplayers, and adapt fast when conditions change. The best results rarely come from perfect gear alone-they come from making the cosplayer feel comfortable while capturing the character at their strongest moment.

Dr. Julian Hartwell is a media studies researcher focused on anime culture, online fandom, digital entertainment, and responsible content access. His work explores how anime fans discover new series, follow licensed streaming platforms, build collectible collections, and participate in global fan communities.
Through clear and practical articles, Dr. Hartwell helps readers understand anime lifestyle trends, collectible value, merchandise choices, and safe legal streaming options. His goal is to make anime-related information easier to understand for both new viewers and long-time fans.